Password managers
Set up XPipe to retrieve passwords from an external password manager
Introduction
Via the available password manager integrations, you can configure XPipe to retrieve passwords and SSH keys from your locally installed password manager. That way, XPipe doesn't have to store any secrets itself, they are only queried at runtime.
The level of support and capabilities vary for each password manager. In general, all password manager integrations support retrieving username+password credentials. In addition to that, some password managers also support storing SSH keys and some provide their own SSH agent. These SSH keys can be retrieved if the integration is configured correctly. For details, refer to the individual sections for each supported password manager.
Learn how to configure your password manager to work with XPipe.
Using credentials for connections
Learn how use credentials from a password manager within XPipe.
Integrations
There are various different integrations available for many popular password managers. You can find the setup instructions for each listed one here.
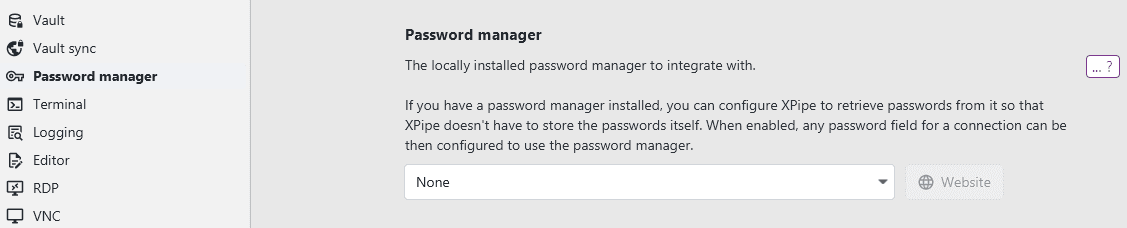
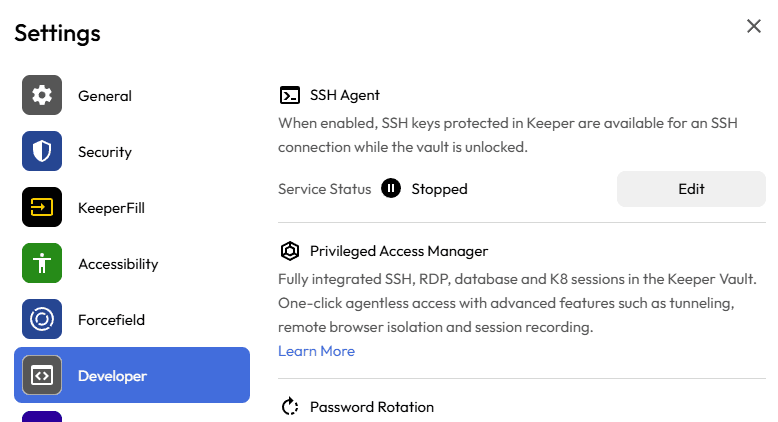
You can enable a password manager integration in the settings menu:
1Password
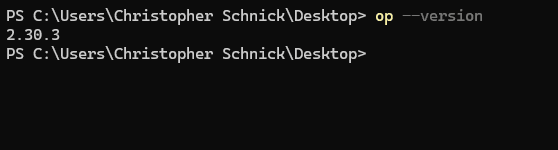
The 1Password integration requires you to first install the 1Password CLI and add it to the PATH. This executable is not included in the normal 1Password installation, so you will have to install it manually:
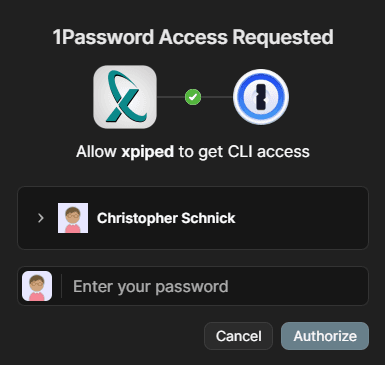
Once the op command is set up, you can instantly use 1Password from XPipe. You will have to confirm the first access request to the vault, but afterwards it will work automatically without user input:
Key format
The 1Password integration supports two different formats of password references. You can choose to just specify the item name in XPipe. This will look up the item in the default 1Password vault. If you are using multiple vaults, however, this might result in entries not being found if they are not in the default vault.
For these cases, there is also the 1Password op:// URL scheme, which allows you to also specify the specific vault to use. For more information, see the 1Password docs. In short, these references have the form of op://<vault>/<item>/password, so for example op://personal/myitem/password to retrieve the item myitem in the personal vault.
Agent
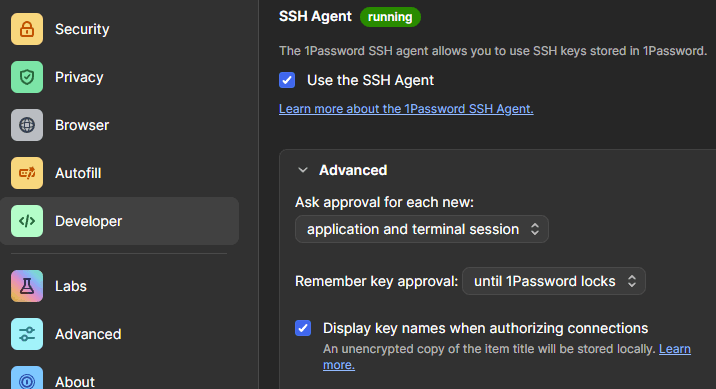
In case you want to use the 1Password SSH agent to access SSH keys stored in 1Password as well, you can enable the SSH agent in the settings menu:
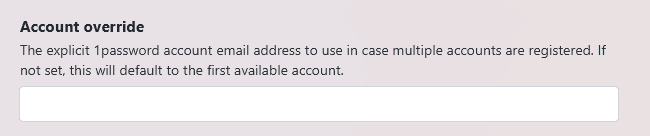
Multiple accounts
If multiple accounts are registered to your 1Password installation, you will have to choose which one to select. This option only shows up if XPipe detects multiple accounts:
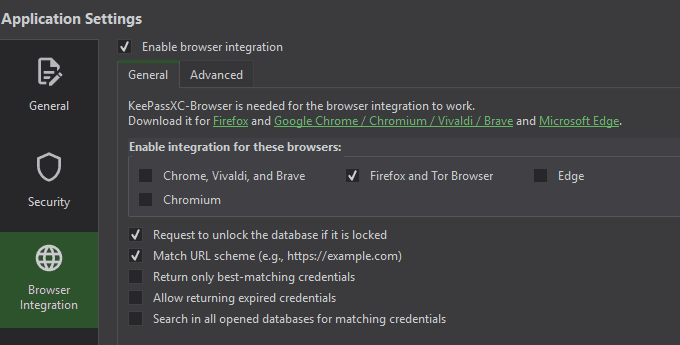
KeePassXC
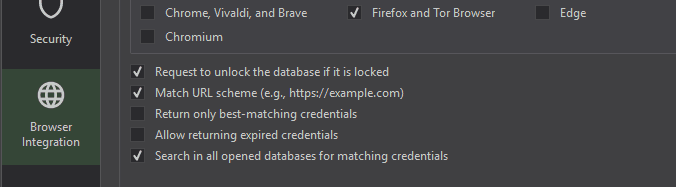
The KeePassXC integration works over the KeePassXC browser extension interface, meaning that it will handle the same way as the KeePassXC browser extensions if you have them installed. For the integration to work, you first have to enable the browser integration in KeePassXC at Tools -> Settings (The browser type checkboxes don't matter here):
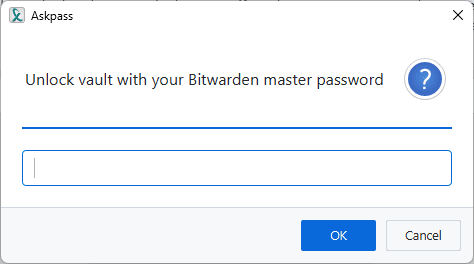
Then, upon the first request from XPipe, you should be prompted to allow XPipe to access your database, assuming that it is unlocked:
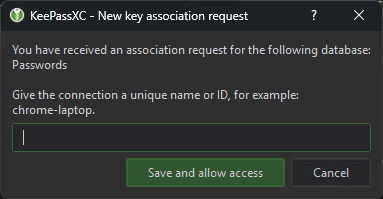
If you confirm this, XPipe will be able to retrieve passwords from KeePassXC.
Item URLs
Since XPipe uses the browser integration feature, XPipe can only access entries by their URL, not their name. Any entry has to be referenced by the URL field. In practice, the URL field doesn't have to be a valid URL; any kind of string will also suffice.
The KeePassXC logic for finding a matching URL might sometimes get confused, e.g. when you use something like subdomains. KeePassXC does not perform exact matching and instead parses the URL and finds the closest one. It is recommended to name entries like sub1_example_com and sub2_example_com instead of sub1.example.com and sub2.example.com. The latter might result in unintended behavior and return multiple entries for any example.com entry you query from XPipe.
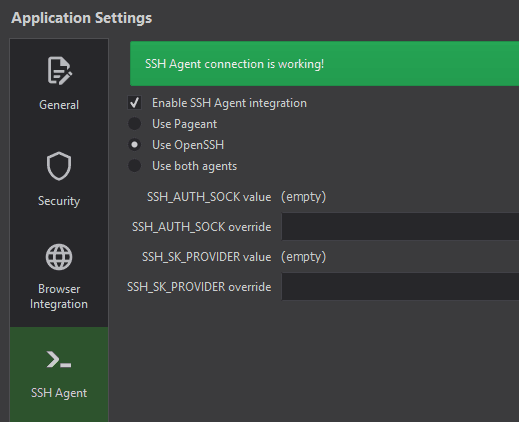
Agent
The KeePassXC does not offer its own agent; instead, it interacts with an existing agent like the OpenSSH agent on a system. You can enable this feature in the KeePassXC settings:
To add keys to the agent, you have to add the key file as an attachment to the entry and then tell the agent which attachment is the key:
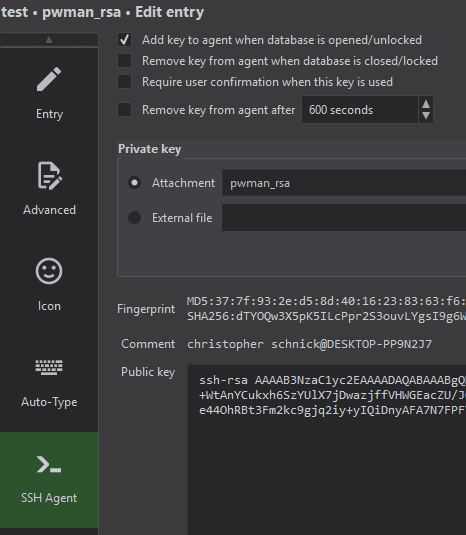
Since KeePassXC only add/removes keys on lock/unlock of the database, you might have to lock and unlock your database first to see the keys added to agent the first time.
Multiple databases
You can also use multiple separate databases at the same time in KeePassXC:
XPipe supports accessing multiple databases, assuming that each one is linked and the Search in all databases option is enabled in KeePassXC:
Bitwarden
The Bitwarden integration requires you to first install the Bitwarden CLI and add it to the PATH. This executable is not included in the normal Bitwarden installation, so you will have to install it manually.
Once the bw command is set up, you will first have to log in initially via bw login. For more information on logging into the Bitwarden CLI, see the Bitwarden docs.

After that is done, you can start interacting with Bitwarden from XPipe. On the first use of the Bitwarden integration during an XPipe session, you will have to enter your vault passphrase to unlock the vault:
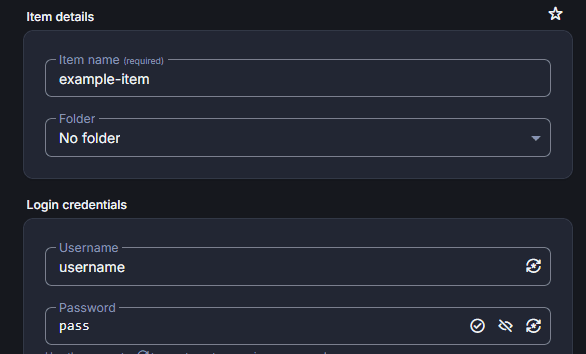
Then, XPipe will be able to retrieve passwords from Bitwarden during the session using the item name of the password entry. For example, you could retrieve the credentials for the following item by specifying the item name example-item in XPipe:
Note that the bitwarden CLI does not like special characters, i.e. anything other than ANSII. To avoid any issues, try to only use ANSII characters for your item names.
Agent
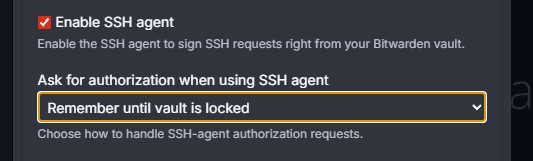
In case you want to use the Bitwarden SSH agent to access SSH keys as well, you can enable the SSH agent in the settings menu:
Keeper
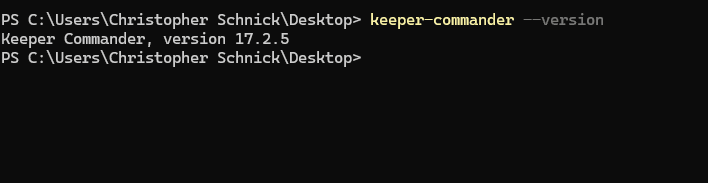
The Keeper integration requires you to first install the Keeper Commander CLI and add it to the PATH. This executable is not included in the normal Keeper installation, so you will have to install it manually:
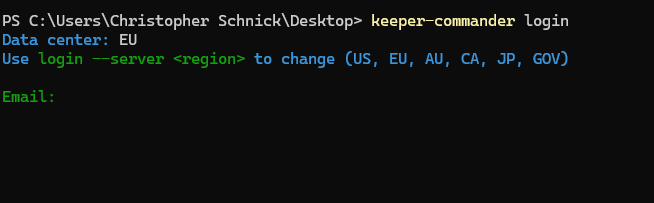
Once the keeper-commander command is set up, you will first have to log in to your Keeper account initially when XPipe connects to the vault:
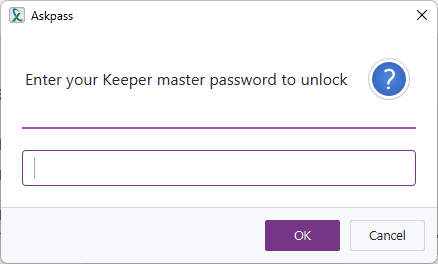
If you are logged in, XPipe will be able to unlock the vault. For that, XPipe will initially prompt for the master password when Keeper is first used during a session:
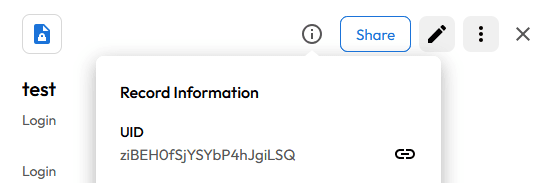
Then, XPipe will be able to retrieve passwords from Keeper during the session using the record's UID, which you can look up for an entry in the Keeper vault interface:
2-Factor authentication
If your Keeper account requires a 2FA login, you have to configure XPipe to expect this via the dedicated option:
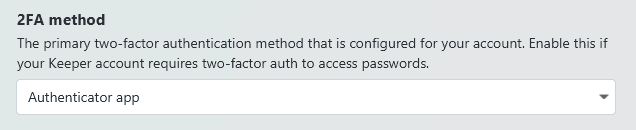
This supports all Keeper 2FA methods. In the case of an authenticator app, it will additionally ask for a 2FA code from your authenticator device when a new password is queried. By default, you will need to provide a new 2FA code for each Keeper item that is requested during an XPipe session.
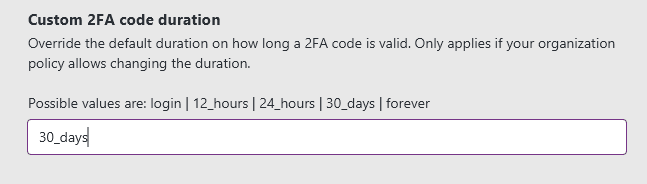
If you want the Keeper CLI to not ask every time for a 2FA code and your administrative Keeper configuration allows it, you can change this requirement to ask less often by specifying a custom duration setting:
SSH keys
Keeper supports retrieving SSH keys in two different ways. It can either retrieve the key directly via the CLI or use the Keeper SSH agent:

If you use the direct CLI method, you don't need to configure any agent and any password manager identity will automatically be able to retrieve the key from just the record ID.
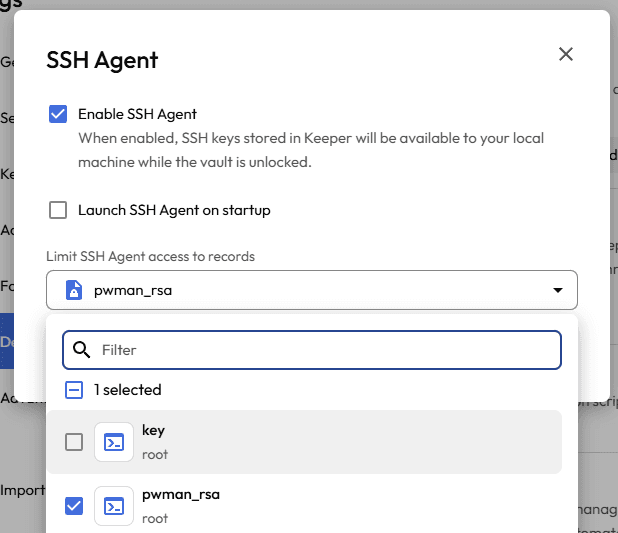
If you want to use the Keeper agent, you will have to enable it first in the settings menu:
You might have to individually select any entries from which the agent should offer keys:
Proton Pass
The Proton Pass integration requires you to first install the Proton Pass CLI and add it to the PATH. This executable is not included in the normal Proton Pass installation, so you will have to install it manually:
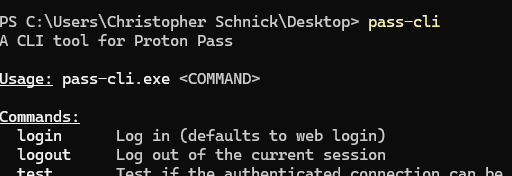
Once the pass-cli command is set up, you will first have to log in initially via pass-cli login. After that is done, you can start interacting with Proton Pass from XPipe.
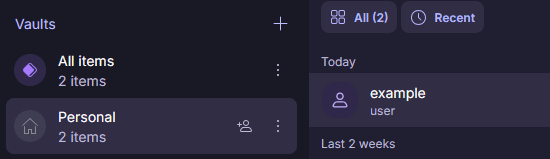
XPipe will be able to retrieve passwords from Proton Pass during the session using the vault name and item name of the password entry in the format of <Vault name>/<Item name>. For example, you could retrieve the credentials for the following item by specifying the item name Personal/example in XPipe:
SSH keys
Proton Pass supports retrieving SSH keys in two different ways. It can either retrieve the key directly via the CLI or use the Proton Pass SSH agent:
If you use the direct CLI method, you don't need to configure any agent and any password manager identity will automatically be able to retrieve the key from just the item name.
If you want to use the SSH agent, you also don't have to do anything as XPipe will be able to start the agent automatically for Proton Pass.
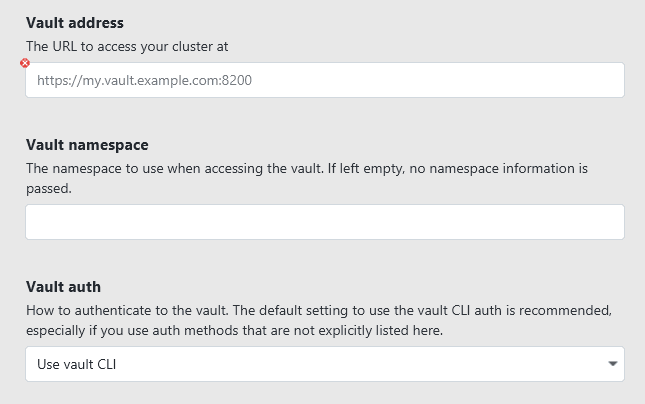
Hashicorp Vault
Hashicorp Vault is a more general purpose secrets engine than a password manager, but it can also be used in XPipe to retrieve credentials and SSH keys. For this, you first need to install the Vault CLI and add it to the PATH:

You then need to configure the vault server details:
When using the Vault CLI the first time in XPipe, a terminal window will automatically open with instructions on how to log into the vault.
Secret references
As Hashicorp Vault can basically store arbitrary encrypted data, you will have to define a mapping under which keys XPipe can find individual entries like username, password, and SSH keys. Furthermore, this secret data can be stored at an arbitrary path as well, meaning that you will have to provide the full path and mapping information for a secret entry. The syntax for this is:
/path/to/secret?user=<field>&pass=<field>&private-key=<field>&public-key=<field>The individual field entries tell XPipe how the actual username/password/key fields are called for the secret entry. If an entry does not provide certain data like an SSH key, you can just omit these fields from the mapping.
For example, if you put data into the vault with vault kv put -mount=secret creds myusername=root mypassword=123, you will be able to retrieve this data with the command vault read /secret/data/creds. Therefore, in XPipe, the query would be /secret/data/creds?user=myusername&pass=mypassword.
As another example, if you store a key entry with vault kv put -mount=secret creds pub=... priv=..., you can retrieve this key in XPipe with /secret/data/creds?private-key=priv&public-key=pub. Since the entry does not provide user/pass credentials, these entries are not included in the query string.
Short-lived SSH certificates
In addition to the normal secret retrieval functionality, XPipe also comes with an integration for short-lived SSH certificates through Hashicorp Vault. For more information, the certificate file section.
OpenBao
As OpenBao is functionally the same as Hashicorp Vault in regard to the secrets engine, refer to the Hashicorp vault section. The only difference is that you should install the OpenBao CLI and use the bao command instead of the vault command.
Passbolt
The Passbolt integration requires you to first install the Passbolt CLI and add it to the PATH:
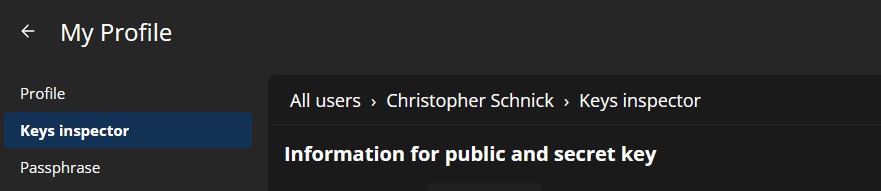
Once the passbolt command is set up, you will have to enter the configuration data of your passbolt server in XPipe. You need the server URL, the gpg private key, and the passphrase from the profile settings page:
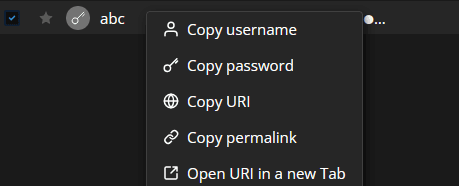
Once you have entered them in the XPipe settings menu, you need to obtain the resource UUID for every password resource you want to use. You can find this ID in the permalink URL for an entry, which you can find at the Copy permalink option:
The integration also supports using your existing CLI config if that is configured. If you are using MFA with TOTP, this is actually required as the MFA prompt can not be filled in a non-interactive mode. See https://github.com/passbolt/go-passbolt-cli?tab=readme-ov-file#mfa on how to configure the passbolt CLI for noninteractive TOTP.
Dashlane
The Dashlane integration requires you to first install the Dashlane CLI and add it to the PATH. This executable is not included in the normal Dashlane installation, so you will have to install it manually:
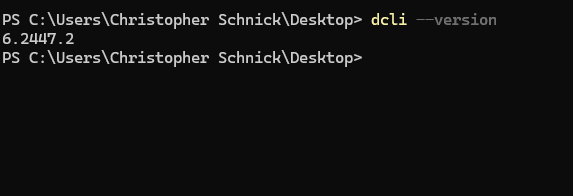
Once the dcli command is set up, you will first have to log in initially when XPipe first connects to the Dashlane vault. Afterward, XPipe will be able to retrieve passwords from Dashlane during the session using the entry's item name.
Passwork
The Passwork integration requires you to first install the Passwork CLI and add it to the PATH:

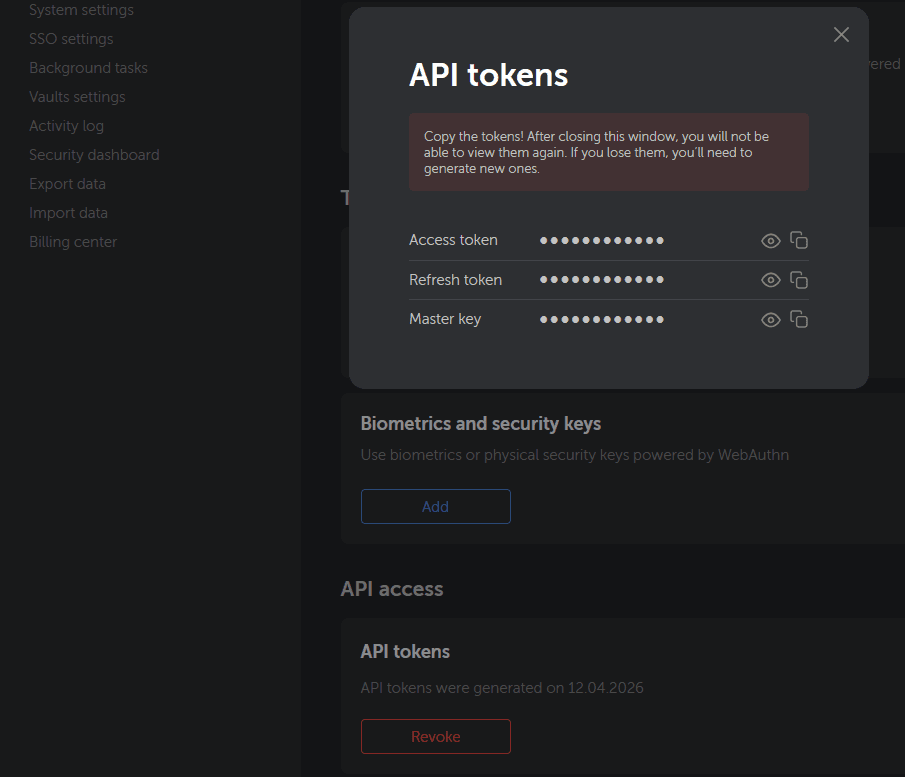
Once the passwork-cli command is set up, you have to generate API tokens for your Passwork account. You can do that in the Authentication settings menu:
Then, after entering those in the settings menu, XPipe should be able to retrieve password entries.
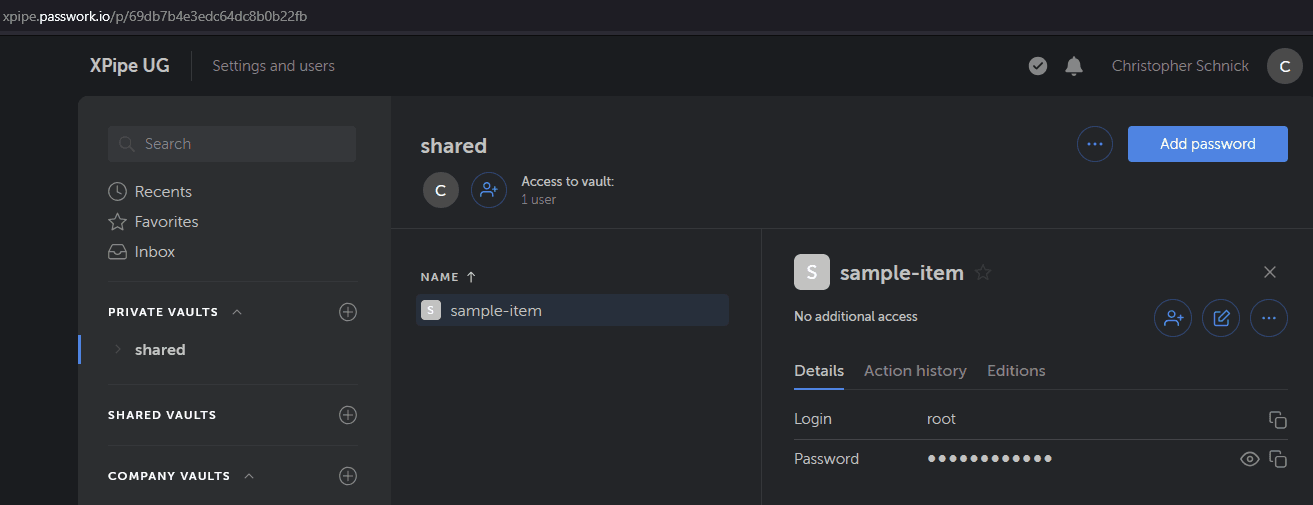
Passwork uses the Item IDs to refer to an entry, not its name. An item ID is in the format of 69db7b4e3edc64dc8b0b22fb. You can obtain the ID of an item by looking at the URL in your Passwork web vault interface:
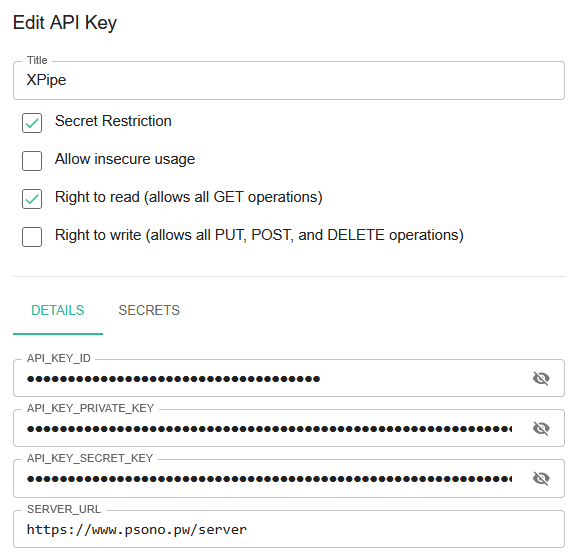
Psono
The Psono integration requires you to first install the Psono CLI and add it to the PATH:
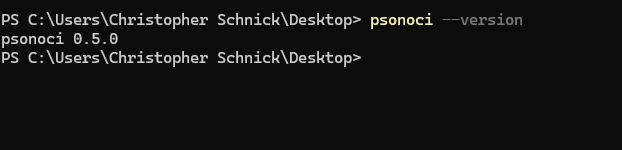
Once the psonoci command is set up, you will have to enter the data of an API key. You can read about how to create one here. You need the API key ID, API key secret key, and server URL from the API key page:
Once you have entered them in the XPipe settings menu, you need to obtain the secret ID for every associated secret. You can associate secrets with this API key in the secrets tab on the same page:
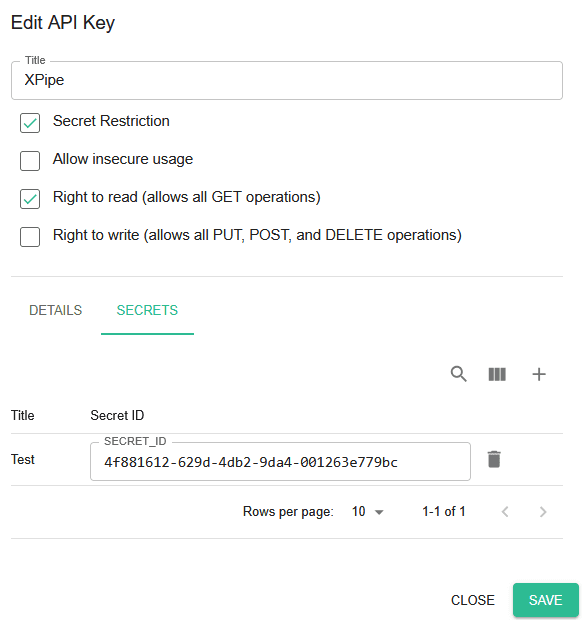
Only secrets that are added to the API key can be queried. The secret ID is specific to an API key, so you can only obtain it from this page.
LastPass
The LastPass integration requires you to first install the LastPass CLI and add it to the PATH. This executable is not included in the normal LastPass installation, so you will have to install it manually.
Once the lpass command is set up, you will first have to log in initially when XPipe first calls the command.
Then, XPipe will be able to retrieve passwords from LastPass during the session using the case-sensitive entry name.
Enpass
The Enpass integration requires you to first install the community-made Enpass CLI and add it to the PATH. This executable is not included in the normal Enpass installation, so you will have to install it manually.
Once the enpass-cli command is set up, you will have to locate your vault.json file. You can find this file at Enpass Settings -> Advanced -> Data location.
XPipe will initially prompt for the master password when Enpass is first used during a session. Then, XPipe will be able to retrieve passwords from Enpass during the session using the entry's item name.
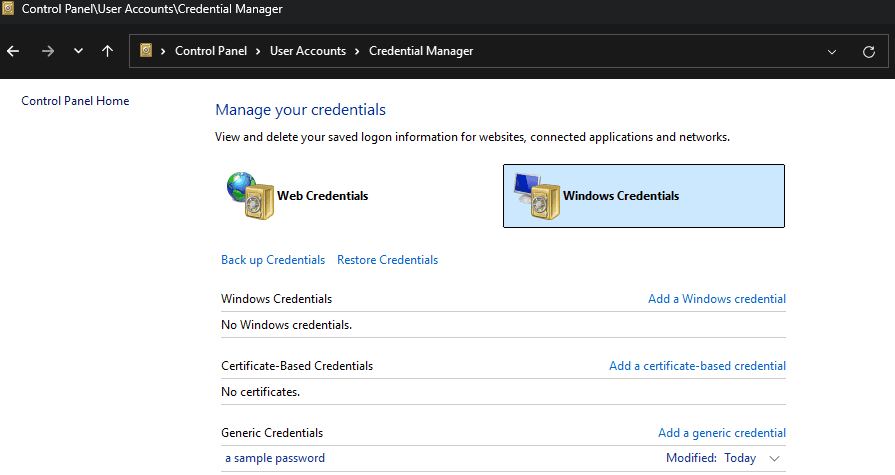
Windows credential manager
On Windows, you have access to the legacy Windows credential manager:
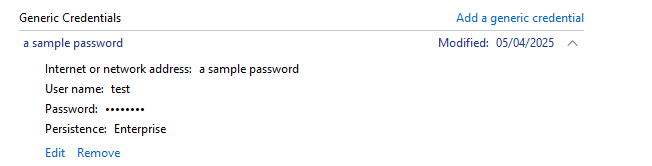
XPipe can retrieve passwords that are stored in the Generic Credentials section from it by referencing the credential title:
Custom command
If you are using a password manager solution that is not supported by a dedicated integration, there's still the option of specifying a custom command to run to retrieve credentials.
The idea is to specify a command template using the placeholder $KEY, which will be replaced by the password reference key. For example, supplying the command mypassmgr get $KEY will be replaced with mypassmgr get "sample-login" by XPipe when the command executed. Any kind of shell command syntax is supported, including features like pipes, redirects, multiline commands, and more.
An important aspect to consider when using a custom command is that XPipe can't supply any user inputs like a vault password when using it. This means that if your password manager CLI requires the user to enter some form of unlock password in the terminal, it won't work. The command will not finish and that case and stays stuck. You might be able to work around this limitation by handling the password input either via some form of file or an askpass tool.
JSON output
The custom password manager integration can either just parse a raw secret that is printed to stdout by the command or alternatively parse JSON output. In case the output is not JSON and just a raw secret, then it can only supply a password. If it prints json, then XPipe can extract full credentials for a username/password/key combination.
If the command mypassmgr get "sample-login" just prints my-p4ssw0rd, it is then interpreted as a single password. If mypassmgr get "sample-login" prints {...}, it is interpreted as json output and requires additional field mappings to extract the individual entries.
As a custom password manager can basically store arbitrary encrypted data, you will have to define a mapping under which keys XPipe can find individual entries like username, password, and SSH keys in JSON output. The syntax for this is:
sample-login?user=<field>&pass=<field>&private-key=<field>&public-key=<field>The individual field entries tell XPipe how the actual username/password/key fields are called for the secret entry. If an entry does not provide certain data like an SSH key, you can just omit these fields from the mapping.
For example, if your command prints:
{
  "myusername": "root",
  "mypassword": "123"
}
you will be able to retrieve these credentials in XPipe with the $KEY query sample-login?user=myusername&pass=mypassword.
As another example, if your command prints:
{
  "priv": "...",
  "pub": "..."
}
you can retrieve this key in XPipe with sample-key?private-key=priv&public-key=pub. Since the entry does not provide user/pass credentials, these entries are not included in the query string.
Using credentials
Secrets stored in your password manager can be used whenever credentials are required in XPipe. This can be either a username and password pair, only a password / secret, or credentials + SSH key.
Using passwords
When creating an identity for connections, you can choose to only retrieve the password itself by choosing to use the password manager to fill the password:
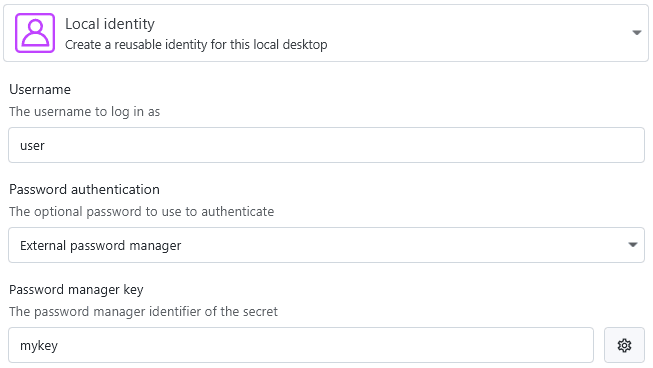
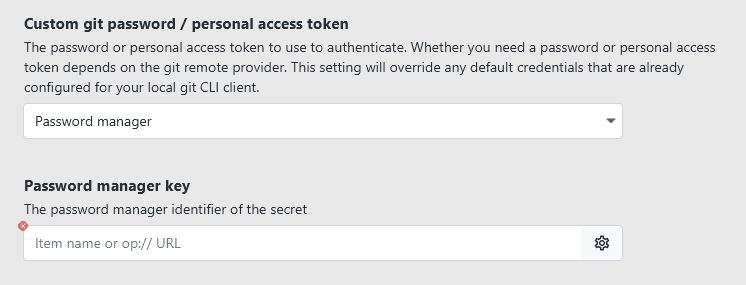
You can choose this option for any kind of secret field in XPipe, it does not have to be a password for a remote connection:
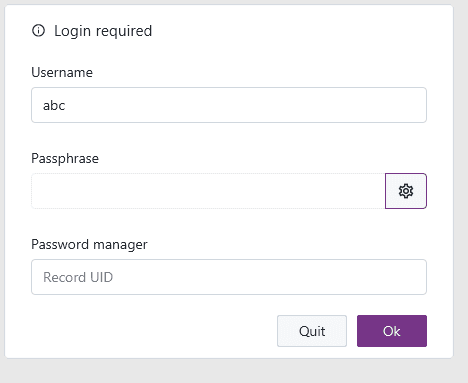
If you are making use of vault users to encrypt vault data, your password manager can also be used to supply the passphrase:
Using identities
If your password manager entries also store usernames, you can fill in username, password, and keys for connection identities by using password manager identities. The option to create these kind of identities will show up in the creation menu once a password manager is configured:

How a password manager identity looks depends on the individual password manager:
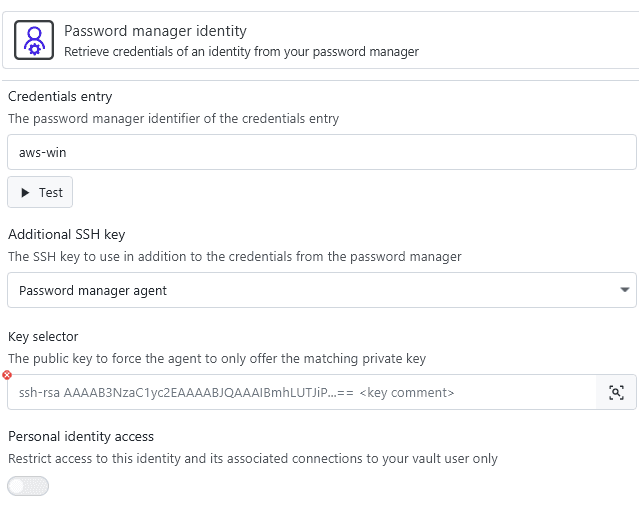
If your password manager supports and is configured for retrieving SSH keys, you can use password manager identities to retrieve the private key for authentication. In some cases, you might have to configure the SSH agent. For password managers that support retrieving keys directly from their CLI, the key is automatically included in the credentials entry.
Which parts of the identity are returned by the password manager for a certain query is visible when using the test buttons.
For more on identities, see the identities page.